Why You’ll Love This Recipe
This cake blends familiar childhood flavors with a bakery-level finish. The peanut butter frosting is smooth and luscious, while the jam adds the perfect burst of sweetness and color. It’s simple to make, visually stunning, and endlessly customizable—you can use your favorite jam flavor, from strawberry to raspberry or even grape. Whether you’re baking for kids or adults, this Peanut Butter & Jelly Cake brings a delightful sense of nostalgia and indulgence to the table.
Print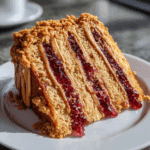
Irresistible Peanut Butter & Jelly Cake – A Nostalgic Classic Turned Into a Show-Stopping Dessert
- Total Time: 50 mins
- Yield: 10–12 servings
- Diet: Vegetarian
Description
This Irresistible Peanut Butter & Jelly Cake takes a nostalgic favorite to new heights — featuring soft, moist peanut butter cake layers filled with sweet strawberry (or grape) jam and topped with luscious peanut butter frosting. It’s the ultimate dessert for PB&J lovers of all ages!
Ingredients
- For the Cake:
- 2 cups all-purpose flour
- 2 1/2 tsp baking powder
- 1/2 tsp salt
- 1/2 cup unsalted butter, softened
- 1/2 cup creamy peanut butter
- 1 cup granulated sugar
- 1/2 cup brown sugar
- 3 large eggs
- 1 tsp vanilla extract
- 1 cup buttermilk
- For the Filling:
- 3/4 cup strawberry or grape jam (or any fruit preserves)
- For the Frosting:
- 1/2 cup unsalted butter, softened
- 1 cup creamy peanut butter
- 2 cups powdered sugar
- 1/4 cup heavy cream or milk
- 1 tsp vanilla extract
- Pinch of salt
Instructions
- Prepare the Cake: Preheat oven to 350°F (175°C). Grease and line two 8-inch round cake pans with parchment paper.
- In a bowl, whisk together flour, baking powder, and salt.
- In a large mixing bowl, beat butter, peanut butter, granulated sugar, and brown sugar until light and fluffy, about 3 minutes.
- Add eggs one at a time, mixing well after each. Stir in vanilla extract.
- Alternate adding the dry ingredients and buttermilk, beginning and ending with the dry ingredients. Mix until just combined — do not overmix.
- Divide batter evenly between the prepared pans and smooth the tops.
- Bake for 25–30 minutes, or until a toothpick inserted in the center comes out clean. Let cool completely before frosting.
- Make the Frosting: In a large bowl, beat butter and peanut butter until smooth. Add powdered sugar, heavy cream, vanilla, and salt. Beat until light and fluffy, 2–3 minutes.
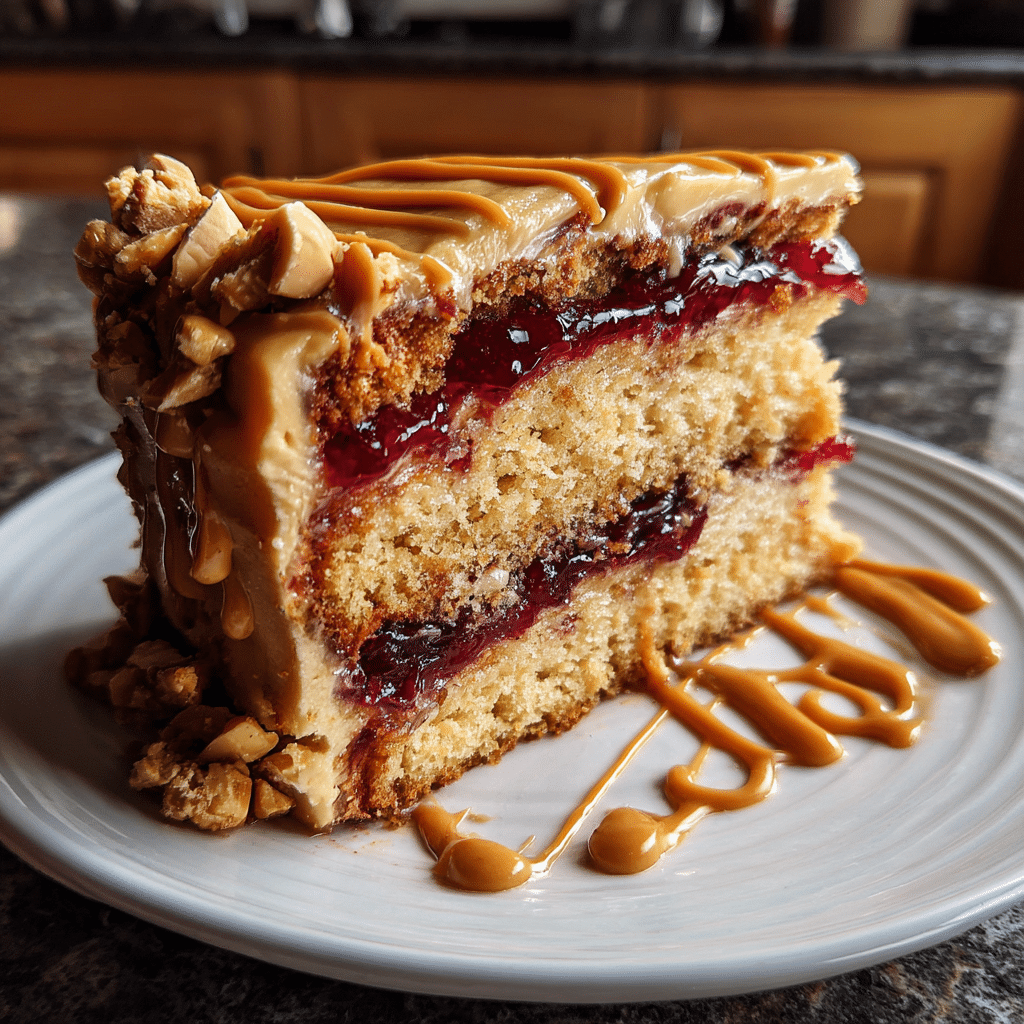
- Assemble the Cake: Place one cake layer on a serving plate. Spread jam evenly across the top. Add the second cake layer and frost the entire cake with peanut butter frosting.
- Optional: Drizzle extra jam over the top or swirl it into the frosting for a marbled look. Garnish with crushed peanuts if desired.
Notes
- Use your favorite jam — raspberry and blackberry work wonderfully too.
- To make cupcakes, divide batter into a muffin tin and bake for 18–20 minutes.
- For a fluffier texture, substitute 1/4 cup of the peanut butter with sour cream.
- Store covered at room temperature for 1 day or refrigerate for up to 4 days.
- Prep Time: 20 mins
- Cook Time: 30 mins
- Category: Dessert
- Method: Baked
- Cuisine: American
Ingredients
(Tip: You can find the complete list of ingredients and their measurements in the recipe card below.)
All-purpose flour: Forms the foundation of the cake, giving it structure while keeping the crumb light and tender.
Baking powder and baking soda: These leavening agents ensure your cake rises beautifully, resulting in a fluffy texture.
Salt: Enhances the sweetness and brings balance to the nutty flavors.
Unsalted butter: Adds richness and helps create a soft, moist crumb. Always use softened butter for easy mixing.
Creamy peanut butter: The star ingredient that gives the cake its signature flavor and dense, moist texture. I’ve tried this recipe with natural peanut butter—it worked great, just make sure to stir it well before adding.
Granulated sugar and brown sugar: The combination creates depth and moisture while maintaining the perfect sweetness level.
Eggs: Bind the ingredients together and add richness.
Vanilla extract: Enhances the flavor of both the cake and frosting.
Buttermilk: Keeps the cake moist and tender with a subtle tang that balances the sweetness.
Fruit jam or jelly: Strawberry, raspberry, or grape jam add the sweet contrast that completes the classic PB&J flavor.
Powdered sugar: Used for the peanut butter frosting, ensuring a smooth and creamy finish.
Heavy cream: Helps adjust the frosting’s consistency for easy spreading.
Directions
Preheat your oven to 350°F (175°C) and grease two 8-inch round cake pans. Line the bottoms with parchment paper for easy removal.
In a medium bowl, whisk together flour, baking powder, baking soda, and salt. In a large mixing bowl, cream butter, peanut butter, granulated sugar, and brown sugar until light and fluffy. Add eggs one at a time, beating well after each addition, then stir in vanilla extract.
Gradually add the dry ingredients to the wet mixture, alternating with buttermilk, beginning and ending with the dry ingredients. Mix until just combined. Divide the batter evenly between the prepared pans and bake for 25–30 minutes, or until a toothpick inserted in the center comes out clean. Let the cakes cool completely before assembling.
For the frosting, beat butter and peanut butter together until creamy. Gradually add powdered sugar, then mix in heavy cream and vanilla until smooth and fluffy. Spread a layer of frosting on the first cake layer, then spoon a generous amount of jam over it. Place the second cake on top and frost the entire cake with the remaining peanut butter frosting. Drizzle extra jam on top and swirl it gently for a beautiful finish.
Essential Equipment
Must-Have Tools to Get Rolling
Here’s what you’ll want to have on hand:
Silicone Spatula – Durable, heat-resistant silicone spatula perfect for mixing, scraping, and spreading. Gentle on non-stick cookware and easy to clean.
Large pot – You’ll need this to boil the whole cabbage head and soften the leaves.
large bowl –Spacious, durable large bowl ideal for mixing, serving, or food preparation. Made from sturdy material and easy to clean.
Sharp knife – For coring the cabbage and slicing out the thick stem in each leaf. A paring knife works best.
Mixing bowl – A big bowl makes it easier to combine your meat and rice filling evenly.
Cutting board – For prepping cabbage leaves and rolling them like a pro.
9×13-inch baking dish – Ideal size to fit your rolled cabbage leaves snugly and prevent them from unraveling.
knife – A sharp, durable kitchen knife perfect for slicing, chopping, and dicing with ease.
Servings and timing
This recipe serves 10–12 people.
Prep time: 20 minutes
Cook time: 30 minutes
Cooling and assembly: 40 minutes
Total time: 1 hour 30 minutes
Storage/reheating
Store the cake in an airtight container at room temperature for up to 2 days, or refrigerate for up to 5 days. Bring it to room temperature before serving for the best texture. You can also freeze the unfrosted cake layers for up to 2 months—just wrap them tightly in plastic wrap and thaw before assembling.
Variations and Customizations
Chocolate-Peanut Butter Delight: Add a thin layer of melted chocolate between the cake and jam for extra decadence.
Peanut Butter Cup Version: Sprinkle chopped peanut butter cups between the layers or on top of the frosting.
Jelly Options: Try different jams—strawberry for sweetness, raspberry for tartness, or grape for a classic PB&J feel.
Crunchy Peanut Butter Frosting: Use crunchy peanut butter for added texture and a nutty bite.
Layered Sheet Cake: Make this in a 9×13-inch pan for an easy, crowd-friendly version.
Salted Caramel Twist: Drizzle salted caramel over the top for a sweet-salty combination.
Vegan Option: Use plant-based butter, almond milk with lemon juice instead of buttermilk, and egg replacers.
Mini Cakes: Bake the batter in cupcake tins for adorable individual servings.
PB&J Drizzle Cake: Warm up the jam slightly and drizzle it artistically over the frosting for a bakery-style look.
Banana Layer Addition: Add sliced bananas between layers for a fun PB&J-Banana combo.
FAQs
Can I use natural peanut butter in this recipe?
Yes, but make sure it’s well-stirred and not too oily for best results.
What type of jam works best?
Strawberry or raspberry jam gives the best flavor and color contrast, but any favorite works.
Can I make this cake ahead of time?
Absolutely! Bake the cake layers a day in advance and frost before serving.
How do I prevent the cake from being dry?
Measure flour correctly and don’t overbake—start checking at 25 minutes.
Can I turn this into cupcakes?
Yes, bake for 18–20 minutes and adjust the frosting quantity as needed.
Can I make the frosting less sweet?
Reduce the powdered sugar slightly and add a pinch of salt to balance flavors.
Is there a gluten-free version?
Yes, use a high-quality 1:1 gluten-free flour blend.
Can I use jelly instead of jam?
Yes, jelly gives a smoother texture while jam adds more fruitiness.
How should I serve it?
Serve slightly chilled or at room temperature with a cold glass of milk or coffee.
Can I add nuts to the batter?
Yes, chopped peanuts or pecans add crunch and enhance the nutty flavor.
Conclusion
This Irresistible Peanut Butter & Jelly Cake is a delightful mix of nostalgia and indulgence. With layers of moist, peanut-buttery cake, luscious frosting, and sweet jam, it captures the spirit of a childhood favorite in a sophisticated dessert form. It’s easy to make, beautiful to serve, and guaranteed to impress everyone who takes a bite. Whether for a party, family gathering, or a simple weekend treat, this cake is the perfect way to relive your favorite flavors—grown-up style.
Looking for more tasty recipes? Visit our website for full details and follow us on Pinterest for daily food ideas to save and share