Why You’ll Love This Recipe
This snack mix is addictive for a reason—it has layers of texture and flavor that keep you coming back for more. It’s incredibly versatile, easy to make in big batches, and stores beautifully for gifting or snacking throughout the week. You can customize it with your favorite nuts, cereals, or candy pieces to make it your own. Plus, it’s ready in under an hour and fills your kitchen with the irresistible aroma of caramel and butter.
Print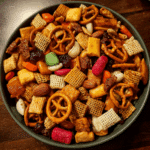
Addicting Snack Mix – The Ultimate Sweet and Salty Party Favorite
- Total Time: 15 mins
- Yield: 10 cups
- Diet: Vegetarian
Description
This Addicting Snack Mix is the ultimate sweet and salty treat — a crunchy blend of pretzels, cereal, nuts, and chocolate all tossed in a buttery caramel or white chocolate coating. Perfect for movie nights, parties, or gifting during the holidays!
Ingredients
- 4 cups Rice Chex or Corn Chex cereal
- 2 cups mini pretzels
- 1 cup roasted peanuts or mixed nuts
- 2 cups popcorn (optional)
- 1 1/2 cups M&Ms or chocolate candies
- 1 cup white chocolate chips or almond bark
- 2 tbsp butter (optional, for richness)
- 1/2 tsp salt
Instructions
- In a large mixing bowl, combine Chex cereal, pretzels, peanuts, and popcorn (if using).
- Melt white chocolate chips and butter together in the microwave in 20-second intervals, stirring between each, until smooth and creamy.
- Pour the melted chocolate over the snack mix and gently stir until everything is evenly coated.
- Spread the mixture out on a large sheet of parchment or wax paper and immediately sprinkle with salt.
- Allow to cool completely, about 20–30 minutes, until the coating sets.
- Once hardened, break into clusters and toss with M&Ms or other candies.
- Store in an airtight container at room temperature for up to 1 week.
Notes
- For a festive twist, use holiday-colored M&Ms or add sprinkles before the coating sets.
- Drizzle with dark chocolate or peanut butter for extra indulgence.
- Add dried cranberries or mini marshmallows for texture and flavor contrast.
- Perfect for packaging in jars or bags as a homemade gift.
- Prep Time: 10 mins
- Cook Time: 5 mins
- Category: Snack
- Method: No-Bake
- Cuisine: American
Ingredients
(Tip: You can find the complete list of ingredients and their measurements in the recipe card below.)
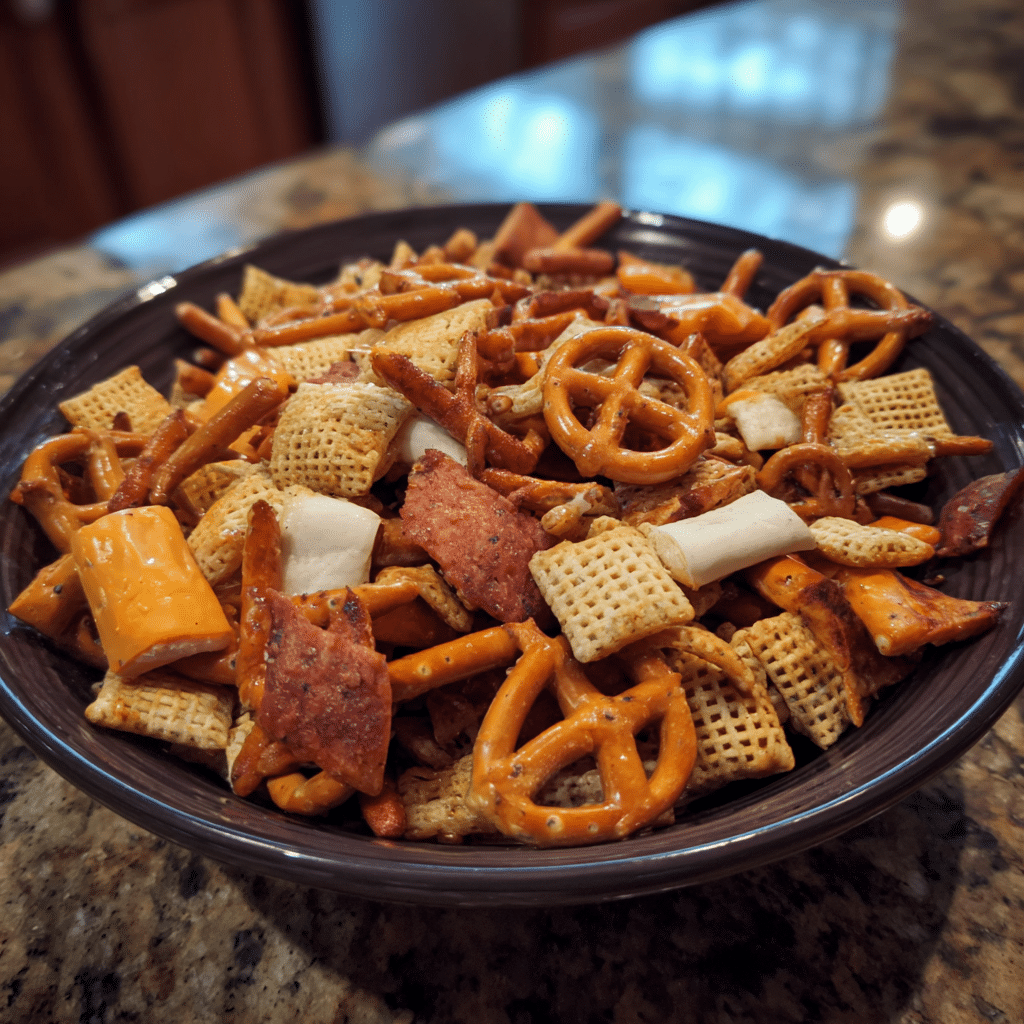
Chex cereal: The foundation of the mix—its light, crispy texture holds the coating perfectly. You can use rice, corn, or wheat Chex, or a combination.
Pretzels: Add that essential salty crunch and balance the sweetness beautifully.
Nuts: Pecans, almonds, or cashews add a rich, nutty depth and extra crunch.
Butter: Creates the luscious caramel coating that ties everything together.
Brown sugar: Adds sweetness and a hint of molasses flavor that deepens the caramel taste.
Corn syrup: Keeps the caramel smooth and helps it coat every piece evenly.
Vanilla extract: Adds warmth and a hint of sweetness to the caramel glaze.
Baking soda: Helps the caramel foam slightly, creating a light, crisp texture when baked.
Salt: A small pinch enhances the sweet and salty balance.
Chocolate candies (like M&M’s): Add a pop of color and a chocolatey touch that makes the mix irresistible.
White chocolate or candy melts (optional): For drizzling over the top after baking—adds extra sweetness and visual appeal.
Directions
Preheat your oven to 250°F (120°C). Line two large baking sheets with parchment paper.
In a large bowl, combine Chex cereal, pretzels, and nuts. Set aside.
In a medium saucepan, melt butter over medium heat. Stir in brown sugar and corn syrup. Bring to a gentle boil, stirring constantly for 3–4 minutes until the mixture thickens slightly. Remove from heat and stir in vanilla extract, baking soda, and a pinch of salt. The mixture will bubble up slightly—this is what makes the coating airy and crisp.
Pour the caramel mixture over the cereal mix and toss until everything is evenly coated. Spread the mix evenly over the prepared baking sheets and bake for 45 minutes, stirring every 15 minutes to ensure even coating and crispness.
Remove from the oven and let cool completely. Once cooled, stir in chocolate candies and drizzle with melted white chocolate if desired. Break into clusters and store in an airtight container.
Essential Equipment
Must-Have Tools to Get Rolling
Here’s what you’ll want to have on hand:
Silicone Spatula – Durable, heat-resistant silicone spatula perfect for mixing, scraping, and spreading. Gentle on non-stick cookware and easy to clean.
Large pot – You’ll need this to boil the whole cabbage head and soften the leaves.
large bowl –Spacious, durable large bowl ideal for mixing, serving, or food preparation. Made from sturdy material and easy to clean.
Sharp knife – For coring the cabbage and slicing out the thick stem in each leaf. A paring knife works best.
Mixing bowl – A big bowl makes it easier to combine your meat and rice filling evenly.
Cutting board – For prepping cabbage leaves and rolling them like a pro.
9×13-inch baking dish – Ideal size to fit your rolled cabbage leaves snugly and prevent them from unraveling.
knife – A sharp, durable kitchen knife perfect for slicing, chopping, and dicing with ease.
Servings and timing
This recipe makes about 10 cups of snack mix.
Prep time: 10 minutes
Cook time: 45 minutes
Cooling time: 15 minutes
Total time: 1 hour 10 minutes
Storage/reheating
Store cooled snack mix in an airtight container at room temperature for up to 2 weeks. For longer storage, freeze in a sealed container for up to 2 months. There’s no need to reheat—just serve straight from the container for a perfectly crunchy bite every time.
Variations and Customizations
Spicy Sweet Mix: Add a pinch of cayenne or chili powder to the caramel for a subtle kick.
Peanut Butter Twist: Stir 2 tablespoons of creamy peanut butter into the caramel before pouring it over the mix.
Holiday Mix: Use red and green candies, mini marshmallows, and drizzle with white chocolate for a festive touch.
Salted Caramel Pretzel Mix: Sprinkle with flaky sea salt after baking for that extra salty-sweet crunch.
S’mores Snack Mix: Add mini marshmallows, chocolate chips, and graham cereal for a campfire-inspired flavor.
Nut-Free Version: Skip the nuts and add popcorn or extra pretzels for crunch.
Cinnamon Sugar Mix: Toss the baked mix with a blend of cinnamon and sugar for a cozy fall flavor.
Cookies & Cream Version: Drizzle with melted white chocolate and crushed chocolate sandwich cookies.
Maple Pecan Crunch: Replace corn syrup with maple syrup and add toasted pecans for a warm, rich flavor.
Trail Mix Style: Add dried cranberries, banana chips, or coconut flakes after baking for a chewy twist.
FAQs
Can I use different cereals?
Yes, any crisp cereal like Cheerios or Crispix works great.
Do I need to bake the mix?
Yes, baking helps the caramel harden and gives the mix its crunchy texture.
Can I make it without corn syrup?
You can substitute honey or maple syrup, though the texture will be slightly softer.
Can I make this in the microwave?
Yes, cook the caramel in 1-minute intervals, stirring between each until smooth, then coat and bake as directed.
How do I prevent the mix from getting sticky?
Bake it fully and let it cool completely before storing.
Can I make this gluten-free?
Yes, use gluten-free pretzels and cereal.
Can I add popcorn?
Absolutely! It adds extra crunch and makes the mix even more fun.
What’s the best way to package this for gifts?
Place cooled mix in cellophane bags or mason jars tied with ribbon—it makes a perfect homemade gift.
Can I double the recipe?
Yes, just use a large roasting pan or two baking sheets to avoid overcrowding.
How long will it stay fresh?
Up to two weeks if stored in an airtight container in a cool, dry place.
Conclusion
This Addicting Snack Mix truly lives up to its name—it’s crunchy, sweet, salty, and completely irresistible. Whether you’re making it for a party, a movie night, or to give as a thoughtful homemade gift, it’s guaranteed to disappear fast. With its simple prep and endless flavor variations, this snack mix is a must-have recipe for every occasion. Once you make it, you’ll find yourself coming back to it again and again—it’s the ultimate crowd-pleaser in every bite.
Looking for more tasty recipes? Visit our website for full details and follow us on Pinterest for daily food ideas to save and share