Why You’ll Love This Recipe
This Red Lobster Biscuit Chicken Pot Pie is the perfect blend of creamy comfort and cheesy biscuit bliss. It’s easy to prepare, customizable, and bakes into a one-dish wonder that feeds the whole family. The biscuit topping is tender and buttery, with just the right hint of garlic and cheddar, making it the ultimate upgrade to the traditional chicken pot pie.
Print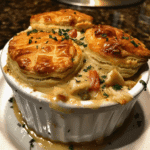
Red Lobster Biscuit Chicken Pot Pie – Creamy, Buttery, and Comfortingly Delicious
- Total Time: 50 mins
- Yield: 6 servings
- Diet: Halal
Description
Red Lobster Biscuit Chicken Pot Pie combines tender chunks of chicken, hearty vegetables, and a creamy herb sauce all baked under a layer of buttery, cheesy Red Lobster-style biscuits — a comforting, restaurant-quality twist on the classic chicken pot pie.
Ingredients
-
- 2 cups cooked chicken, shredded or cubed
- 1 cup frozen mixed vegetables (peas, carrots, corn, green beans)
- 1/2 cup onion, diced
- 2 tablespoons butter
- 2 tablespoons all-purpose flour
- 1 1/2 cups chicken broth
- 1/2 cup heavy cream (or milk)
- 1/2 teaspoon salt
- 1/4 teaspoon black pepper
- 1/2 teaspoon garlic powder
- 1/2 teaspoon dried thyme
For the Red Lobster Biscuit Topping:
-
- 2 cups all-purpose flour
- 1 tablespoon baking powder
- 1/2 teaspoon baking soda
- 1 teaspoon sugar
- 1/2 teaspoon salt
- 1 teaspoon garlic powder
- 1/2 cup cold unsalted butter, cubed
- 1 cup shredded cheddar cheese
- 3/4 cup buttermilk (plus more if needed)
For Garlic Butter Topping:
- 2 tablespoons melted butter
- 1/2 teaspoon garlic powder
- 1/2 teaspoon dried parsley
Instructions
- Preheat oven to 200°C (400°F). Lightly grease a 9×13-inch baking dish.
- Make the filling: In a large skillet, melt butter over medium heat. Add onions and cook until soft, about 3 minutes.
- Whisk in flour and cook for 1 minute to form a roux. Gradually add chicken broth while whisking until smooth. Stir in cream, salt, pepper, garlic powder, and thyme.
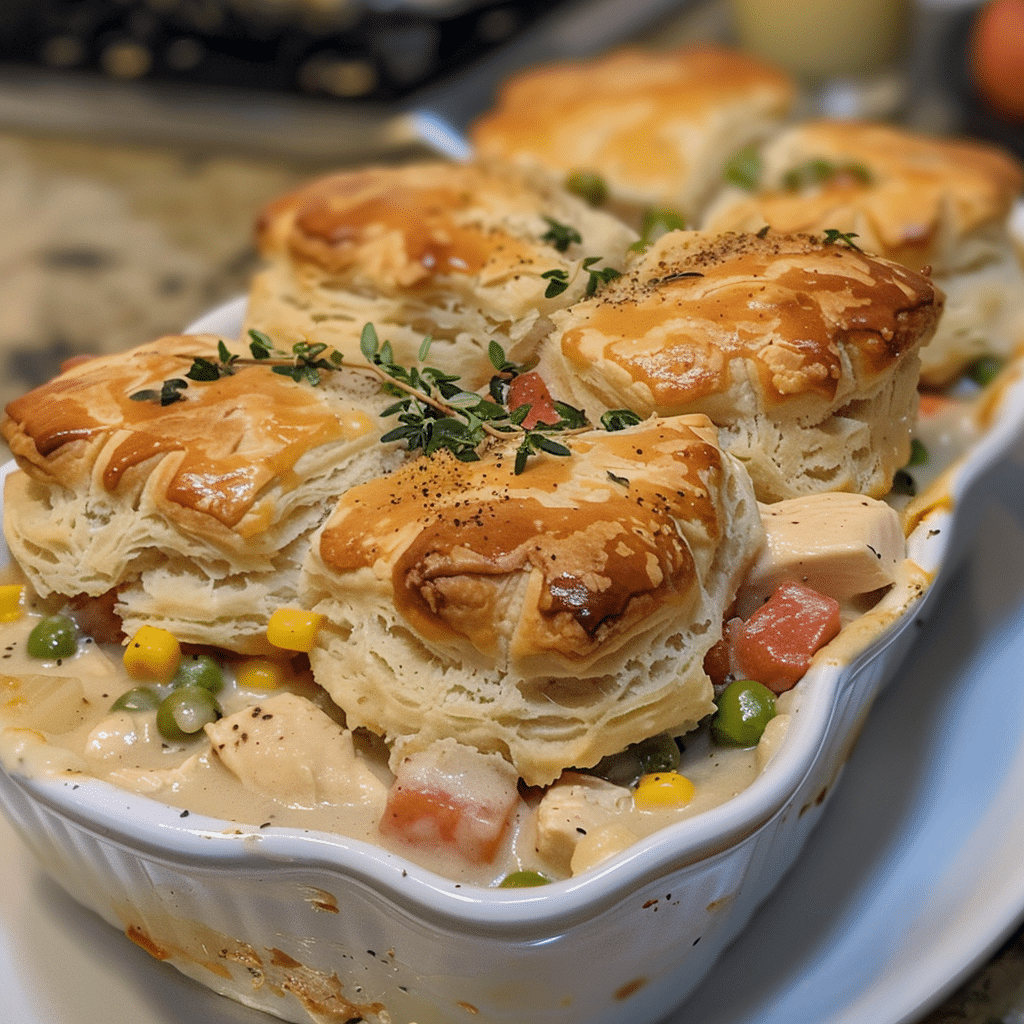
- Add cooked chicken and mixed vegetables. Simmer for 5 minutes, until thick and creamy. Transfer the mixture to the prepared baking dish.
- Make the biscuit topping: In a large bowl, whisk together flour, baking powder, baking soda, sugar, salt, and garlic powder. Cut in cold butter using a pastry cutter or fork until coarse crumbs form.
- Stir in cheddar cheese, then pour in buttermilk. Mix just until combined — do not overmix.
- Drop spoonfuls of biscuit dough evenly over the chicken mixture, leaving small gaps for steam to escape.
- Bake for 25–30 minutes, or until biscuits are golden brown and cooked through.
- Make garlic butter topping: Mix melted butter, garlic powder, and parsley. Brush over hot biscuits right after baking.
- Let cool for 10 minutes before serving warm.
Notes
- For a shortcut, use Red Lobster Cheddar Bay Biscuit Mix for the topping — just prepare as directed and spoon over the filling.
- Add a dash of cayenne pepper to the biscuits for a subtle spicy kick.
- This dish freezes well — bake, cool, and freeze for up to 3 months. Reheat covered at 180°C (350°F).
- Prep Time: 20 mins
- Cook Time: 30 mins
- Category: Main Course / Casserole
- Method: Baking
- Cuisine: American
Ingredients
(Tip: You can find the complete list of ingredients and their measurements in the recipe card below.)
Cooked chicken – Shredded or cubed rotisserie chicken works perfectly and saves time.
Red Lobster Cheddar Bay Biscuit Mix – The signature topping that makes this dish so special—fluffy, garlicky, and cheesy.
Mixed vegetables – A colorful blend of carrots, peas, corn, and green beans adds texture and flavor.
Onion – Sautéed for depth and sweetness in the creamy sauce.
Garlic – Infuses the filling with savory aroma.
Butter – Used for both the biscuit topping and the creamy sauce.
All-purpose flour – Thickens the filling for that classic pot pie texture.
Chicken broth – Forms the base of the sauce; choose low-sodium if you prefer more control over the seasoning.
Heavy cream or milk – Adds richness and velvety smoothness to the sauce.
Cheddar cheese – Mixed into the biscuit dough for that classic cheesy flavor.
Garlic powder and parsley flakes – Add that unmistakable Red Lobster biscuit flavor.
Salt and black pepper – Essential for seasoning the filling to perfection.
Directions
- Preheat your oven to 400°F (200°C). Lightly grease a 9×13-inch baking dish or deep pie dish.
- In a large skillet, melt butter over medium heat. Add diced onion and sauté for 4–5 minutes until softened. Stir in garlic and cook for 30 seconds.
- Sprinkle flour over the onions and stir continuously for 1 minute to form a roux.
- Slowly whisk in chicken broth and cream, stirring until the mixture thickens into a smooth sauce (about 3–5 minutes).
- Add cooked chicken and mixed vegetables to the sauce. Season with salt and pepper to taste. Pour the filling into the prepared baking dish.
- In a mixing bowl, prepare the biscuit topping according to package instructions. Stir in shredded cheddar cheese for extra flavor.
- Drop spoonfuls of the biscuit dough evenly over the chicken mixture, leaving a few small gaps for steam to escape.
- Bake uncovered for 25–30 minutes, or until the biscuit topping is golden brown and cooked through.
- Optional: Brush the tops with melted butter mixed with garlic powder and parsley for that signature Red Lobster finish.
- Let cool for 5–10 minutes before serving to allow the filling to thicken slightly.
Essential Equipment
Must-Have Tools to Get Rolling
Here’s what you’ll want to have on hand:
Silicone Spatula – Durable, heat-resistant silicone spatula perfect for mixing, scraping, and spreading. Gentle on non-stick cookware and easy to clean.
Large pot – You’ll need this to boil the whole cabbage head and soften the leaves.
large bowl –Spacious, durable large bowl ideal for mixing, serving, or food preparation. Made from sturdy material and easy to clean.
Sharp knife – For coring the cabbage and slicing out the thick stem in each leaf. A paring knife works best.
Mixing bowl – A big bowl makes it easier to combine your meat and rice filling evenly.
Cutting board – For prepping cabbage leaves and rolling them like a pro.
9×13-inch baking dish – Ideal size to fit your rolled cabbage leaves snugly and prevent them from unraveling.
knife – A sharp, durable kitchen knife perfect for slicing, chopping, and dicing with ease.
Servings and timing
Servings: 6–8
Preparation time: 20 minutes
Cooking time: 30 minutes
Total time: Approximately 50 minutes
Storage/reheating
Store leftovers in an airtight container in the refrigerator for up to 4 days. Reheat in a 350°F (175°C) oven for 15–20 minutes or microwave individual portions for 1–2 minutes. The biscuit topping stays crisp if reheated in the oven. This dish also freezes well—cool completely, cover tightly, and freeze for up to 2 months. Thaw overnight in the refrigerator before reheating.
Variations and Customizations
Turkey Pot Pie Version – Perfect for using Thanksgiving leftovers; swap chicken for turkey.
Loaded Potato Style – Stir in diced potatoes and top with crumbled bacon before baking.
Broccoli Cheddar Twist – Replace mixed vegetables with broccoli florets and add extra cheese to the filling.
Spicy Kick – Add a pinch of cayenne or diced jalapeños to the filling or biscuit mix.
Cream of Chicken Shortcut – Use one can of cream of chicken soup instead of making the sauce from scratch for a faster version.
Vegetarian Option – Replace the chicken with sautéed mushrooms, tofu, or extra veggies and use vegetable broth.
Bacon Ranch Flavor – Add cooked bacon bits and a spoonful of ranch seasoning to the filling.
Herbed Biscuit Topping – Mix in Italian herbs or rosemary to the biscuit dough for an aromatic twist.
Double Crust Idea – Spread a thin layer of biscuit dough on the bottom before adding filling for extra biscuit goodness.
Cheesy Garlic Explosion – Add a layer of shredded cheese directly over the filling before topping with biscuits for ultimate indulgence.
FAQs
Can I use homemade biscuit dough instead of the mix?
Yes, any savory cheddar biscuit dough will work beautifully with this recipe.
Can I use canned biscuits?
You can, but the Red Lobster mix gives a much richer, garlicky flavor.
What if I don’t have heavy cream?
Use milk or half-and-half, but the sauce will be slightly lighter.
Can I make this ahead of time?
Yes! Assemble the filling and topping separately, refrigerate, then bake when ready to serve.
How do I keep the biscuits from getting soggy?
Bake uncovered so the steam escapes and the biscuit tops crisp up.
Can I make it gluten-free?
Yes—use gluten-free flour for the sauce and a gluten-free biscuit mix.
Can I add extra cheese?
Absolutely! A mix of cheddar and Monterey Jack adds extra gooeyness.
Can I use frozen chicken?
Yes, but thaw it completely and drain any excess moisture before adding.
What vegetables work best?
Classic pot pie veggies—peas, carrots, corn, and green beans—work perfectly.
Can I cook it in a cast-iron skillet?
Yes, and it gives the biscuits an even crispier, golden bottom crust.
Conclusion
The Red Lobster Biscuit Chicken Pot Pie is pure comfort in a casserole dish—creamy, savory filling topped with buttery, golden cheddar biscuits. It’s hearty enough for a main dish yet easy enough for weeknights, combining everything you love about pot pie with the indulgent flavor of Red Lobster’s famous biscuits. Whether you serve it for family dinner or a cozy weekend meal, this dish guarantees warm smiles and happy plates every time.
Looking for more tasty recipes? Visit our website for full details and follow us on Pinterest for daily food ideas to save and share